This is blog post will lay the foundations to buffer-overflow. I recommend you read this blog first before going to the practical session which is followed in another post.
Overview
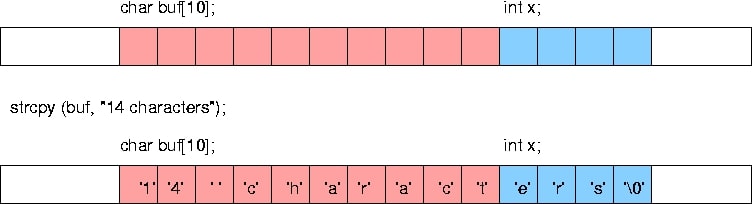
A buffer overflow, or buffer overrun, is an anomaly where a program while writing data to a buffer, overruns the buffer’s boundary and overwrites adjacent memory
Buffers are areas of memory set aside to hold data, often while moving it from one section of a program to another, or between programs. Buffer overflows can often be triggered by malformed inputs; if one assumes all inputs will be smaller than a certain size and the buffer is created to be that size, then an anomalous transaction that produces more data could cause it to write past the end of the buffer. If this overwrites adjacent data or executable code, this may result in erratic program behavior, including memory access errors, incorrect results, and crashes.
Exploiting the behavior of a buffer overflow is a well-known security exploit. On many systems, the memory layout of a program, or the system as a whole, is well defined. By sending in data designed to cause a buffer overflow, it is possible to write into areas known to hold executable code and replace it with malicious code. Buffers are widespread in the operating system(OS) code, so it is possible to make attacks that perform privilege
Programming languages commonly associated with buffer overflows include C and C++, which provide no built-in protection against accessing or overwriting data in any part of memory and do not automatically check that data written to an array(the built-in buffer type) is within the boundaries of that array. Bounds checking
Setting up the Environment
Over this demonstration, we will be using linux (“Linux parrot 4.14.0-parrot13-amd64 #1 SMP Parrot 4.14.13-1parrot13 (2018-01-21) x86_64 GNU/Linux”to be specific) and some of it’s Utilities. But before we get started, there are few basic commands which you need to understand.
Understanding, Why Linux?
A few of you may not know Linux and would prefer to use Microsoft windows. For you guys, this is a very good opportunity to get started with Linux. But, that doesn’t mean, all of this is possible in windows; each and everything which we are going to do today can be accomplished in Windows using some of the other tools. But, I prefer Linux because of many reasons:
- Terminal – This one is my favourite. In linux, we get a shell and to be precise, default shell for Debian linux is Bash. There are also many other shells available like sh, dash, zsh etc… The shell makes it really easy to interact with the linux OS. Even though it’s not GUI but again, it’s just a matter of preference. Take this as an example. In the scanning and Enumeration phase, we have used a tool called Nmap. Now, there is an equivalent GUI available for Nmap which is called Zenmap. So, whatever task you are trying to accomplish using Nmap, can also be accomplished using Zenmap. That’s pretty much the gist of it.
- User-friendly Commands– Again an arguable point, but for me a matter of preference. Linux commands are really easy to understand and construct. We will be discussing some of them here but it is important to make a note that Linux commands are case sensitive unlike Windows.
- Root – Now this is a point on which absolutely no one will argue. Some of the Linux Distros give you root access. Their is not a single operating system in the market available free-of-cost that gives you Root Access apart from some of the distributions of Linux like Kali, ParrotOS, Arch Linux. For more info on this, visit http://www.linfo.org/root.html
Getting Started with Shell
There are many demonstrations available online which will show you how to install linux either as a Virtual Machine or as Dual boot, so we are not going to discuss about that. Let’s get started with ParrotOS.
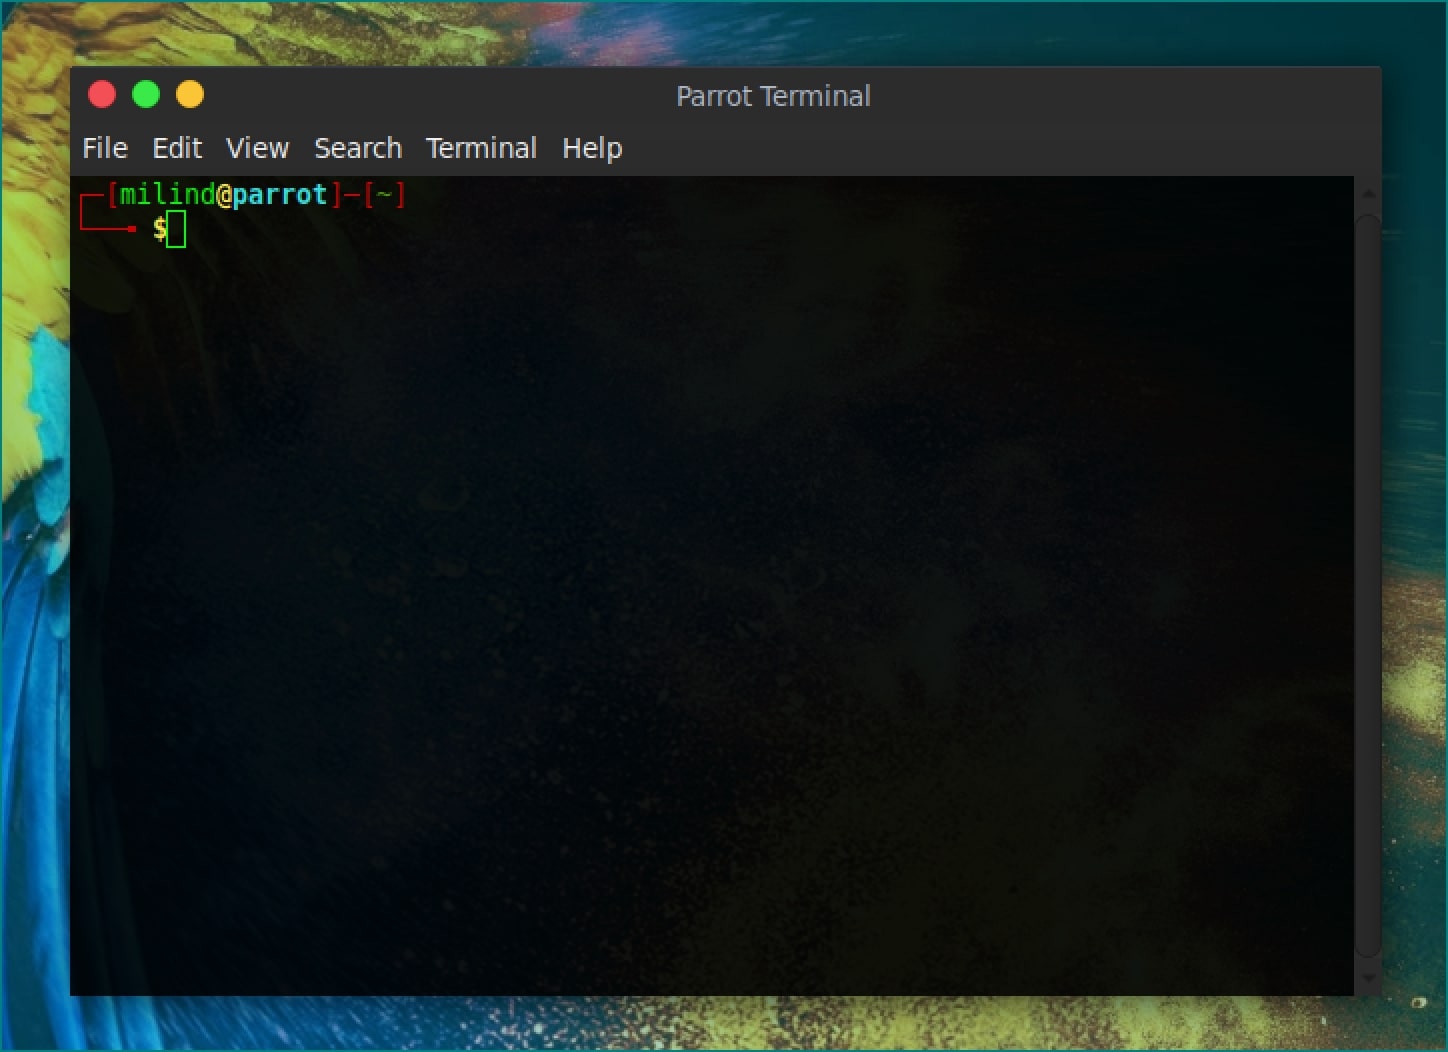
As you are aware, like Kali Linux, ParrotOS also gives you access to root. The first thing you need to do is fire up the terminal. You can do that by pressing Ctrl+Alt+T, or through the Menu Bar. If you are using ParrotOS just like me, then you should be seeing something like this on your screen. We won’t go much in-depth about the terminal, but just to let you know, the part before @ is known as username and after that is known as hostname. This is followed by the “~”, which is your current working directory. Tilde (“~”) symbol basically tells that you are currently in your home directory. There are other directories as well, like
Important Commands and Concepts
Here are a few commands which we will be using throughout this demonstration.
- “ls” – list the directories and files
- “cd” – change directory
- “mkdir” – create a directory
- “man command” – display the information about any command.
- “file filename” – displays the information about a specific file.
- “touch filename” – This command is used to create a file with a filename.
- “cat filename” – This command displays the content of a file named filename.
- “
su username” – This command is used to switch user. - “
sudo command” – This command is used to run any command in Linux as the root user. - “nano filename”- create or edit a file using the nano command-line editor.
- “
chmod <mode> filename” – used to give specific permission to a file or directory. - “python” – launch python framework
- “python -c ‘<python commands>’” – run python commands directly in the terminal.
- “gdb” – launch the GNU Debugger.
- “
hexdump -c filename” – Used to dump entire file in the current shell in hexadecimal format. - “
gcc filename.c -o output.exe” – compile a C file and name it’s binary to output.exe - “./output.exe” – run a binary compiled file.
- “|” character – This is basically an operator which is useful when the output of one command serves as the input of another command.
- “>” – This is also an operator which is used when the output of one command is to be stored somewhere. Let’s say for example you want to store directory structure into a file, then you will execute ls > file.txt. The operators “>”, “<“, “<<“ , “>>” and “|” are called redirection operators.
- “
objdump -d filename” – This will disassemble entire filename and display all of its code in a shell. - “
objdump -c filename” – This is used to show header information about the filename.
And Many more…
These are only a few commands which we will be using across this demonstration. If you don’t understand them as of yet, no need to worry. As we proceed, you will definitely be able to grasp things. As this demonstration is focused on bufferoverflow, we won’t be able to go much in-depth with linux. Although I encourage you all to use linux, if you want to learn more about it, google it. Be sure to refer man pages. I will be adding references at the end of this demonstration check them out as well.
Python
So, in-order to cause bufferoverflow, we need some huge amount of data. I am going to take help of python to generate that data for carrying out our tasks. Now again, there are many other alternatives available to generate such data, but I prefer python as it is easy to understand and a lot more user-friendly with not much syntax to remember. We won’t be going much in-depth with python as well, just some basics.
So you can fire up python by typing
$ python
Python 2.7.10 (default, Jul 15 2017, 17:16:57)
[GCC 4.2.1 Compatible Apple LLVM 9.0.0 (clang-900.0.31)] on darwin
Type "help", "copyright", "credits" or "license" for more information.
>>>
Now, type
>>> print “Hello World”
Hello World
So, as it can be seen clearly, “Hello World” gets printed on the screen. Now try doing something like this
>>> print “Hello World”*10
Hello World Hello World Hello World Hello World Hello World Hello World Hello World Hello World Hello World Hello World
Did you see just what happened? The word “Hello World” gets printed on the console 10 times. Python is
Coming back to your bash shell, let us try to generate the same output using python command line parameter.
python -c 'print "Hello World"'
Hello World
Vola, “Hello World” gets printed.
The same goes for printing our string multiple times:
$ python -c 'print "Hello World”*10'
Hello World Hello World Hello World Hello World Hello World Hello World Hello World Hello World Hello World Hello World
Let’s try one more thing. What if I want to store this result in some txt file? Even by using python, there are numerous ways in which this can be accomplished, but we will look out for the most easiest way. As you might be aware of, we have used redirection operators
$ python -c 'print "Hello World”*10’ > attack.txt
This script will create a file named attack.txt and store “Hello World Hello World Hello…” in that file. Try to remember this command as we will be using this a lot through our entire demonstration.
Another important thing which you will need to refer to is the ASCII table. This is important because we will be dealing with memory spaces inside the RAM. It is important to make a note that buffer overflow only occurs in Memory. Your computer’s memory is it’s RAM. As we are going to play with the memory we need to communicate with the memory, in the way it understands. We shall discuss on this point later but for now, understand that ASCII table is also one of the prerequisites.

Which brings us to our last prerequisite,
Understanding Memory and Stack
A bufferoverflow exploit is a situation in where we are using some low level C function to write a string or some other variable into a piece of memory that is only of a certain length. But we are basically trying to write something into it longer than that, and it then overwrites the later memory addresses which causes problems. So, let’s start talking about roughly what happens in memory when a program is run.
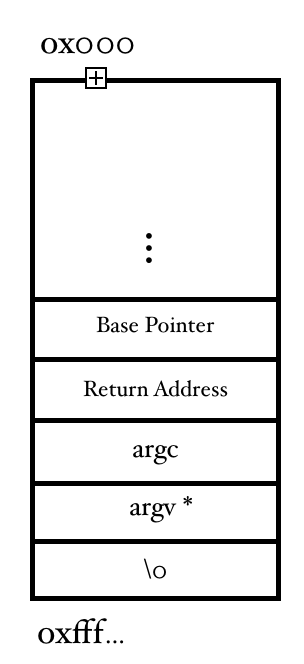
When a program is run from the operating system, the OS calls the main method (function) of your program, and this entire program is held in a very specific way by the memory which is also consistent between different processes. I’ll be using Virtual Memory Address Translation to explain you how this works, consider a large block of RAM, which starts from 0x000… to 0xfff… The lower part of the ram is 0x000 and the higher bound address is 0xfff.
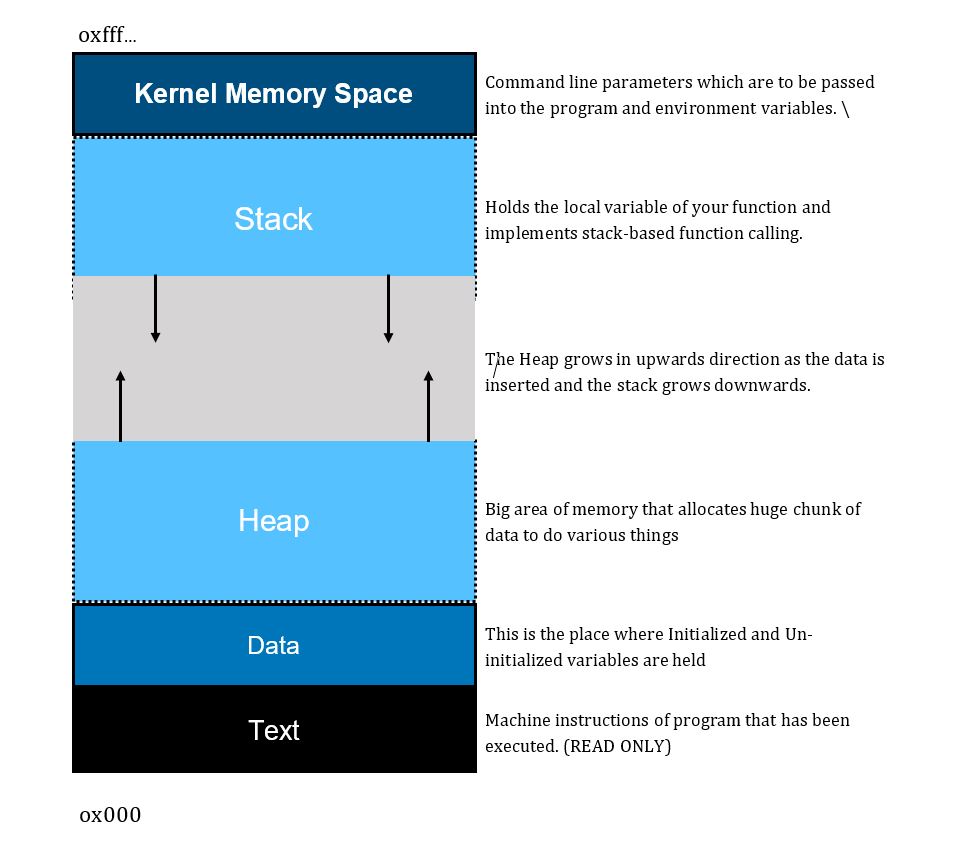
The above diagram explains the structure of memory when a program is loaded, this is the same structure which is followed by the memory for each and every process. Keep in mind that this is valid across all the operating systems. For now, we will only talk about stack-based buffer overflow.
Stack is one of the basic data structure which we all are aware of in computer science. Stack follows LIFO (Last In First Out) rule. Since it is a prerequisite as well, let’s revise it! A number of points are to be noted about stack which are important to us.
- Stack is a linear data structure – which means that there is always a sequence that is going to be followed while inserting or removing an item.
- Memory is Allocated at Runtime – Whatever data that is going to be stored in stack is allocated during runtime.
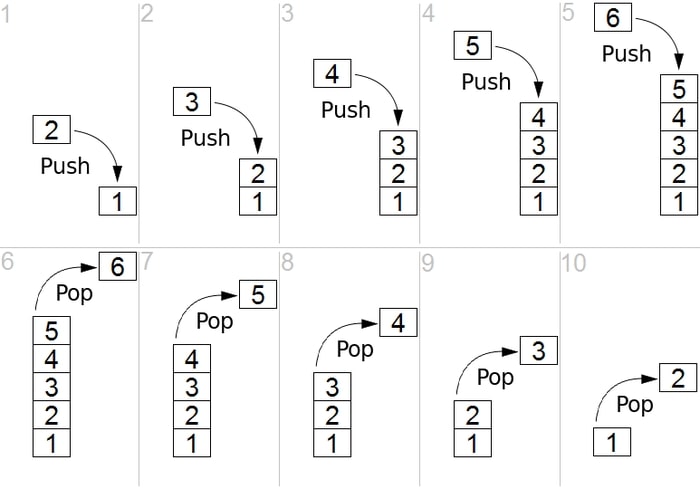
- Has only 2 operations – Stack uses only 2 operations to
store and retrieve data,
- PUSH – This operation is used to store data into the stack.
- POP – This operation is used to retrieve data from the stack.
And we are basically going to exploit this procedure of stack.
Now, I am going to represent stack in horizontal format because it is easier to understand that way, but keep in mind that we are using Virtual Memory Address Translation so whatever are the values of addresses mentioned over here are relative and may or may not comply to any of the operating system’s architecture.
So, from this representation, the structure of stack should be clear. But, let us understand this with the help of an example.
Consider the following block of code which is written in C language. It is trying to take some input from the user using command line parameters and storing it in the buffer at compile time.
#include<stdio.h>
#include<string.h>
int main(int argc, char const *argv[])
{
 	char buff[500];
 	strcpy(buff, argv[1]);
 	printf("%s\n",buff);
	return 0;
}
Inside the main function, we are simply copying the command-line parameter argv[1] to our character array which has been allocated 500 bytes of space inside the memory. As the space is being allocated at the compile time so the allocated space is provided inside stack.
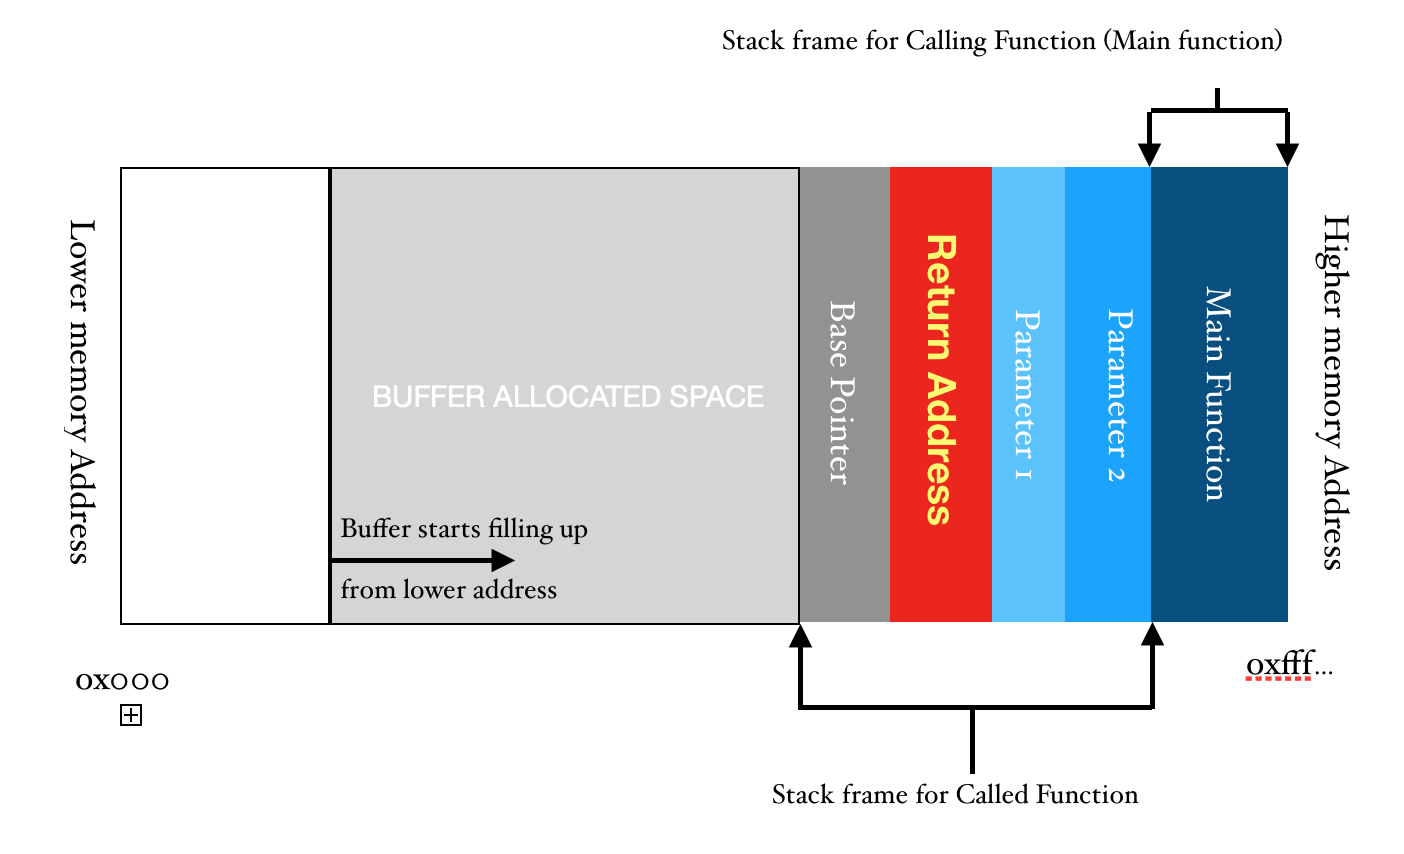
Let’s start from the beginning; When the program is executed using ./a.out, the operating system transfers the control to the main function, which simply means that from a thread, main() is called. Hence, main() becomes the “Called function” which is being called by the operating system. Therefore, the OS will stop executing its own routine and transfer the control to main() subroutine. Hence, it loads all the parameters that have been passed via the command-line into the stack. After the parameters have been passed, the return address is pushed into the stack and the address of base pointer is also pushed sequentially. Return Address is basically the pointer to the location from where a subroutine was called from the parent routine. The Base Pointer is the address of location in the stack to which the parent routine was pointing to before the subroutine was called. So, before execution of the main function, the structure of stack looks something as shown below.
When the main function starts executing from line 3, the 1st order that the operating system gives is to allocate space inside the memory at line number 5 for our variable buff. Now, it is important to keep in mind that we may use the terms array and pointer interchangeably, but both of them are absolutely the same, keep that in mind!
Now, when the instruction at line number 5 is executed, a buffer of space 500 is allocated inside the stack at the compile time. So, our stack looks something like the fig 2. In fig 2, I have clubbed argc and argv* into one section called the parameters as their representation inside the memory is not required anymore. Also make a note of addresses, when the stack starts filling up, it goes upwards, but the upward addresses are lower in-memory addresses. Also, now for the sake of convenience, I will represent the stack horizontally.
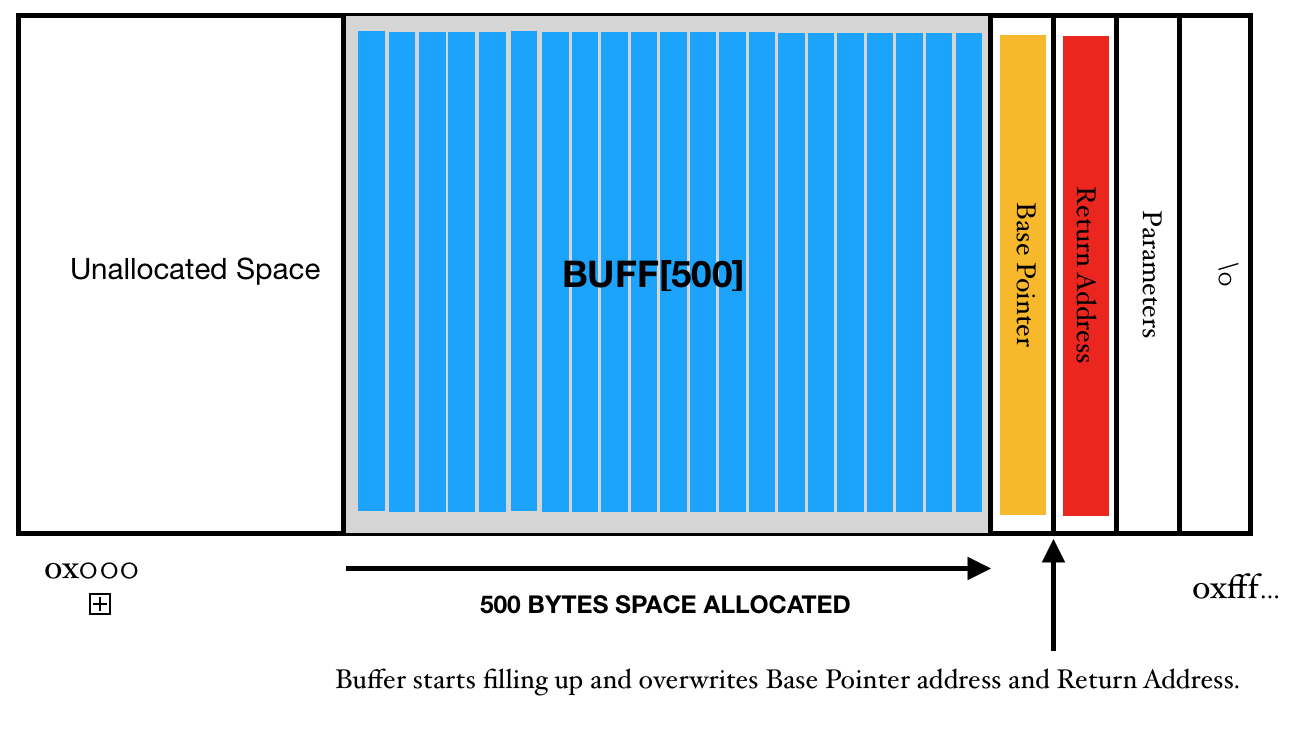
When a data of fewer than 500 Bytes
In the step number 7, we are only printing the contents of buff variable.
In the step number 8, we return the control to the parent routine. However, if there was no buffer overflow, the stack pointer would have accessed the return address and program would have ended up smoothly. But that is not the case here, we have overwritten the return address and so the program will not end the way, the programer would have thought. It will jump off to the address which has been overwritten. And this can create all sorts of problems. Hence, to the program, it may seem that it has written the control to the Operating system and operating system is constantly waiting for the control to return but we have taken the control in our hand and now we will do whatever we want.
This sounds so cool theoretically, but is this practically possible? Yes ofcourse, this is possible and in our coming sections, we will look at how to do this practically.